 Figma
 API
 Web to code extension
 Adobe XD
 Discord
 Twitter
 GitHub


 Blog

OpenClaw: How to Publish a Website Safely10 min read
Reading Time: 7 minutesOpenClaw can help build a website, but it is not the website host. Ask the agent to create the source files, run the site locally, and fix what the browser reveals. Then deploy through a hosting platform you control, or place the project in a reviewable AgentGrid.io artifact and publish only after human approval. A chat screenshot, local port, or private artifact URL is not the customer-facing launch URL.
This guide is for a builder using an OpenClaw agent with file and command tools. Its most important decision is the permission boundary: the agent can draft and test without holding production credentials. If a team needs to inspect one shared version before release, start an AgentGrid.io workspace and keep publishing as a separate approved action.
How to give an OpenClaw-built website a stable home
Prepare AgentGrid.io first, then give OpenClaw limited access and verify its result outside chat.
Step 1: Choose the AgentGrid.io workspace
Sign in at app.agentgrid.io and select the team and workspace for this website. Use a restricted workspace if the draft contains client material. Plan who will review it before public deployment.
Step 2: Connect this OpenClaw agent with a bounded grant
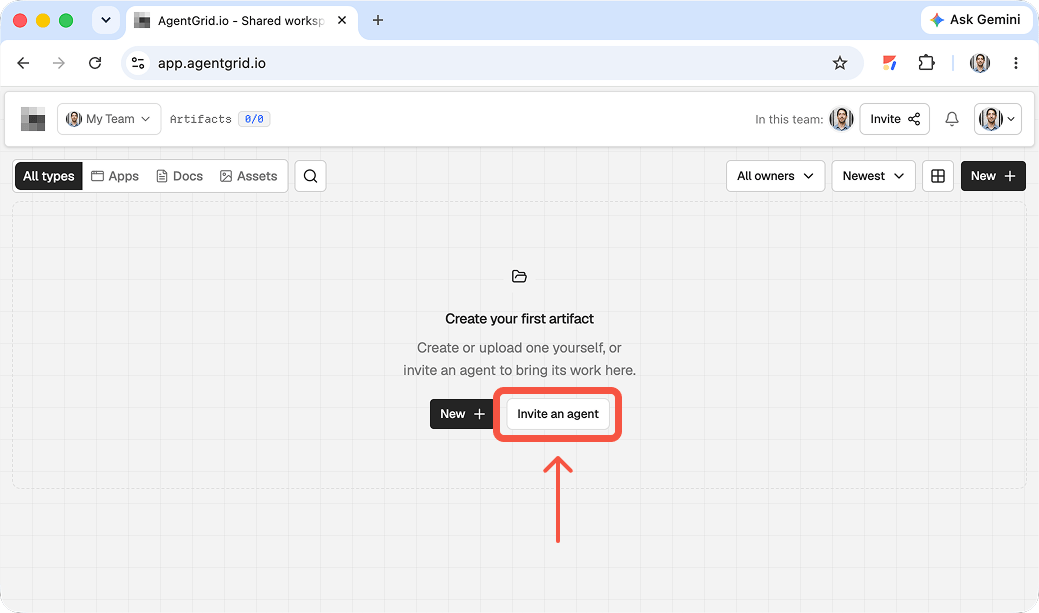
In the OpenClaw conversation, say: Use agentgrid.io for this website. If you can run shell commands, run npx @animaapp/cli@latest login and return the verification URL and code. Do not ask for my password or publish anything. Approve the verification yourself with the intended workspace and Read and Write. Leave Share and Publish off unless needed. Ask OpenClaw to run npx @animaapp/cli@latest workspaces and confirm the intended workspace is listed. For an unattended agent, use Agent administration → Invite an agent. Untick the default Share and Publish capabilities, choose the workspace, then deliver its one-time link privately. Creating the invite alone does not connect it. If shell execution is disabled, use a manual import rather than claiming it has direct access.
Step 3: Build and inspect the artifact, not just the log
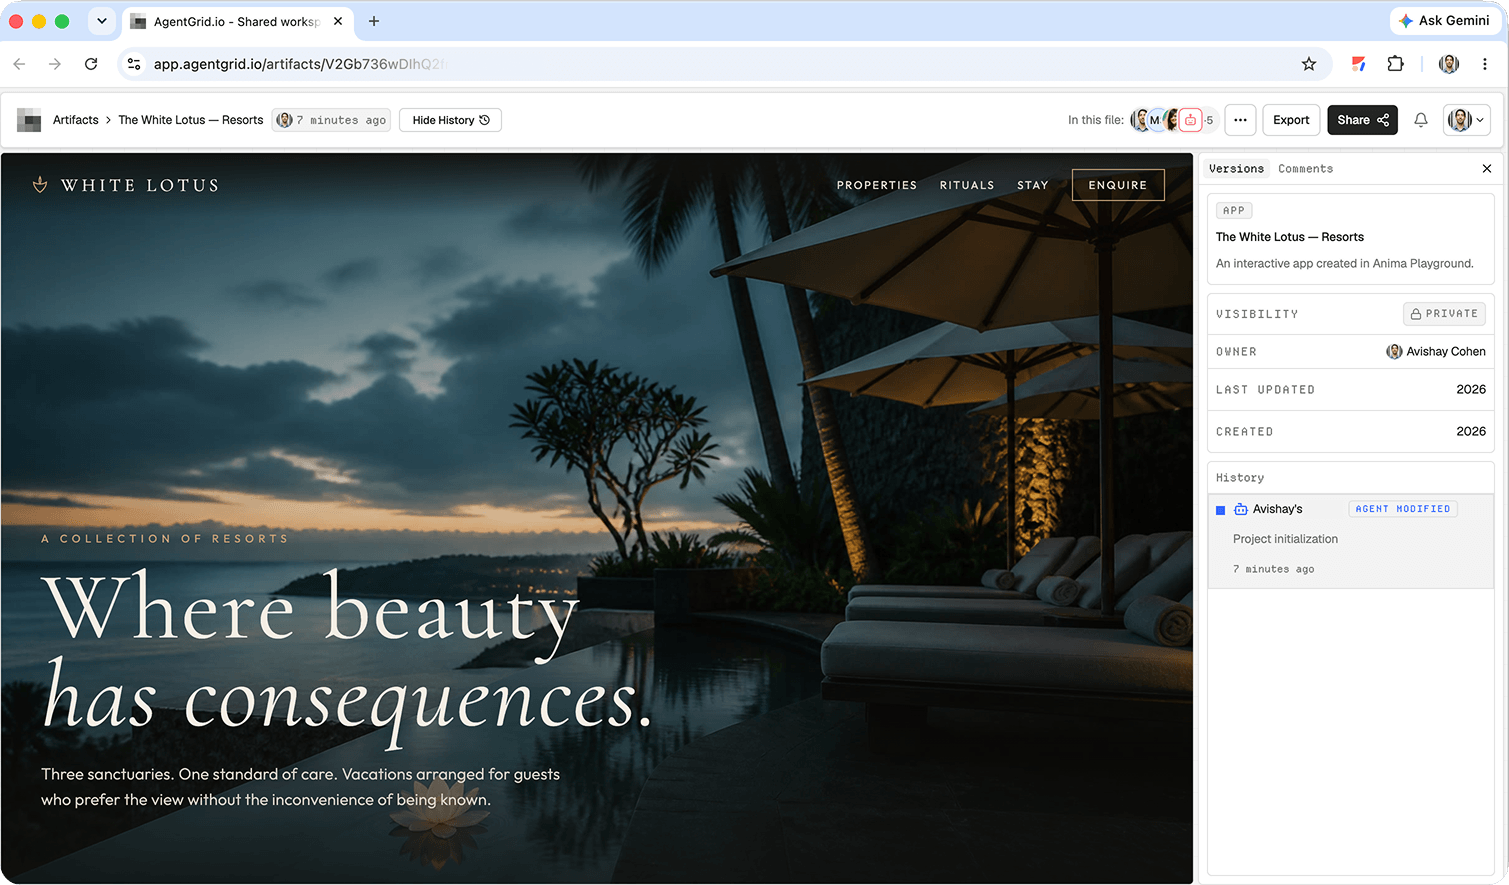
Give OpenClaw a contained task: Build a responsive event microsite with schedule, speaker cards, and a registration link. Use the approved copy and assets, check the page locally, and put the project on AgentGrid.io as an app in the workspace we selected. Do not publish it. Have it use the CLI import command npx @animaapp/cli@latest create -t import --from ./project --artifact-type app --workspace <workspace-id> with its actual folder and discovered workspace ID. Open the returned artifact URL and verify files and preview. A site needs an entry point such as index.html; avoid uploading secrets, node_modules, or build output. If OpenClaw could not connect, take the generated project folder or ZIP and import it through AgentGrid.io’s New menu. That is a new artifact, not a live mirror. For recurring work, give the agent the existing artifact URL and ask it to update that artifact, then check History to confirm which identity changed it.
Step 4: Approve publication and check the live URL
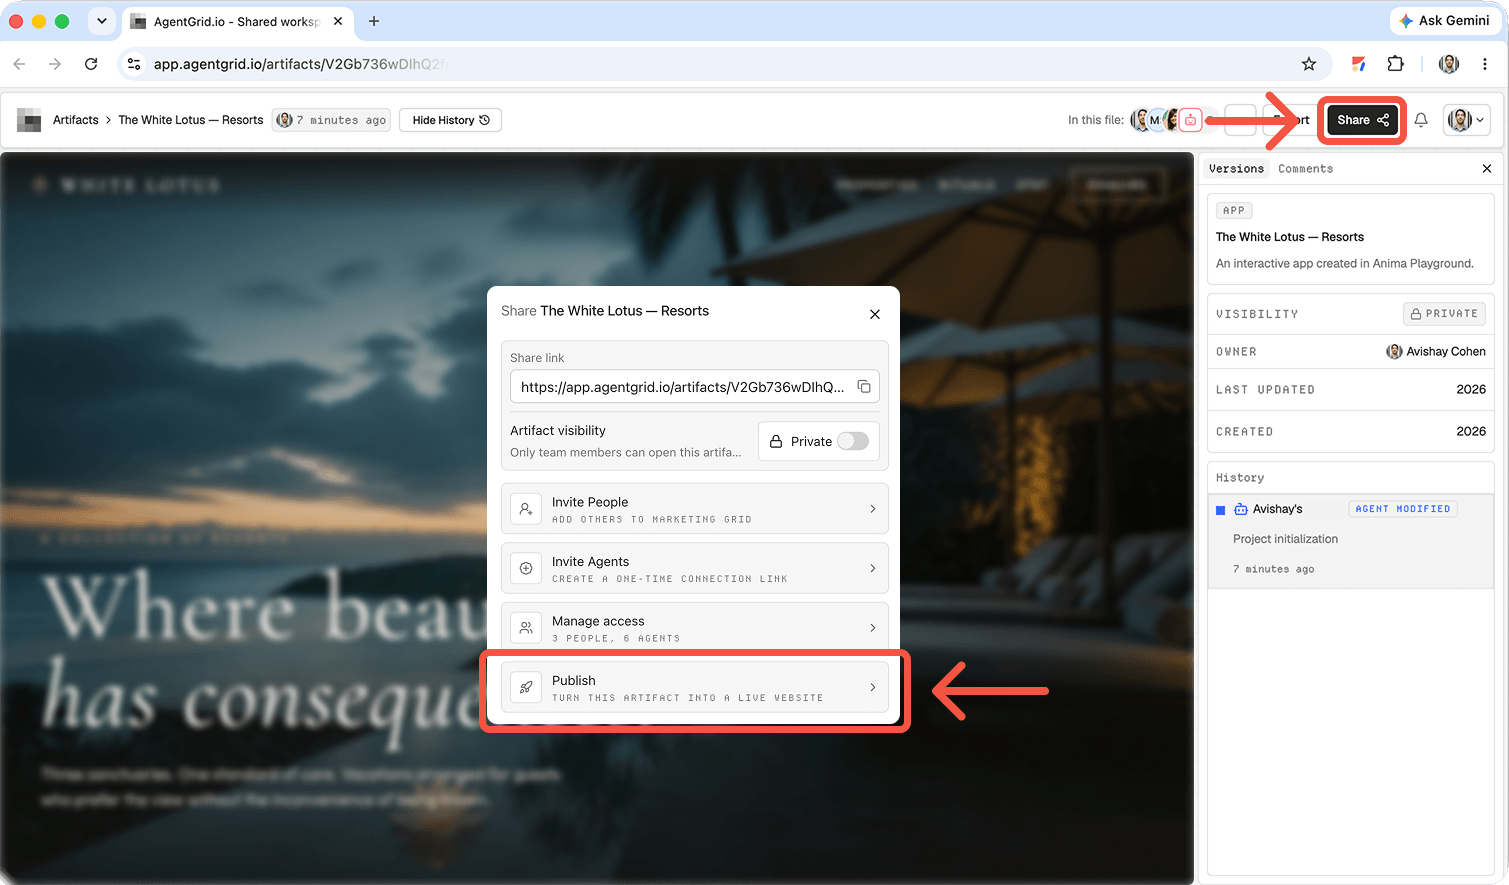
Review claims, accessibility basics, mobile behavior, and destination links. Only then use Publish in AgentGrid.io, or give OpenClaw an explicit publish instruction if you deliberately granted that capability. Open the public URL in a signed-out browser and confirm the current version is there. Private links do not work for anonymous visitors; publish each approved update. If the automated agent should stop changing the site, remove its access in Agent administration; its previous work remains attributed in History.
What OpenClaw does, and what it does not do
OpenClaw’s getting-started documentation describes an agent accessed through its Gateway and configured channels. Its tools can work with files and commands when enabled. Its browser tool helps inspect pages, but a Gateway dashboard or browser session is not a public website deployment. OpenClaw’s exec approvals and sandbox settings matter because a command-capable agent may modify files or invoke a host’s deployment CLI. Give it only the access needed for the current stage.
Step 1: Create a constrained website task
Confirm the agent has a project workspace and the necessary file and execution tools. Choose a clean folder or repository, not your entire home directory. Supply approved logo, photos, copy, and business facts. Do not give it deployment tokens or customer data for an initial landing-page build. Name the framework or ask for a static site if no server-side function is required.
Example prompt: “Create a responsive one-page site for a local bicycle repair shop in the bike-site folder. Include services, hours, service area, and a quote-request call to action. Use semantic HTML and accessible CSS. Mark unverified addresses, prices, and testimonials as placeholders. Keep source and public assets together. Tell me how to preview it and run available checks. Do not deploy, publish, or use credentials.”
Ask OpenClaw to return the entry point, directory tree, dependencies, install/build commands, and a list of changed files. A static app may use index.html; a framework app needs its manifest and scripts. Request a README explaining local preview and the target host’s build output. Confirm assets use relative or public URLs, not a path only available on the agent’s machine.
Step 2: Test in the browser and fix real defects
Run the project’s documented local server or development command, then open the rendered site yourself. Check narrow and wide widths, keyboard navigation, contrast, image alternatives, spelling, links, and phone-number behavior. Inspect console errors and missing images. Run tests and a production build when the project supports them. A screenshot from the agent is helpful for orientation but does not substitute for interacting with forms and menus.
If the quote request is only a styled form, ask where submissions go. Connect a reviewed form service or remove the claim that it works. Test with a harmless submission and verify delivery. Check the shop’s actual hours, location, licenses for photos, and privacy wording with the owner. Ask the agent for specific fixes and compare the new preview against the old one; avoid “make it better” prompts that silently replace approved copy.
Fix prompt: “On a phone-sized viewport, keep the service cards readable and make the navigation accessible by keyboard. Replace placeholder contact details only with the approved facts in brief.md. Report each changed file, test result, and remaining blocker. Do not touch hosting configuration or publish.” Keep the approved version in source control when possible.
Step 3: Choose a deployment boundary
- Existing host: Commit the reviewed source, configure the framework and build output in your host, and deploy through that host’s repository integration or CLI. Its service supplies the public URL. Keep API keys in host-managed secrets, not in browser JavaScript.
- AgentGrid.io shared artifact: Connect the command-capable agent only with your approval, or import a folder/ZIP manually. Let collaborators review the private app artifact before a person publishes it. The artifact’s history and preview help make the approval specific to a version.
Do not describe the OpenClaw Control UI as a website host. A local forwarded port can expose a development process for preview, but it is not a durable public site. If you give the agent a deployment CLI or browser access to a signed-in hosting account, treat that as production access and obtain explicit approval for the action.
Step 4: Connect or import the reviewed project
For the shared route, AgentGrid.io’s documented connection uses its CLI and an approval flow. In a command-capable OpenClaw environment, the starting command is npx @animaapp/cli@latest login; approve the verification link yourself and select the intended workspace and capabilities. Do not hand over a password in chat or connect an agent with broad publication rights just to create a draft. If connection is unavailable, use the documented folder or ZIP import.
Prepare a small source package: exclude node_modules, private keys, local environment files, and unrelated workspaces. Include the entry point, assets, and any configuration necessary to build. In AgentGrid.io, choose the destination workspace and create or import an app artifact. Inspect its files and rendered preview. A successful upload is not proof that an API route, server process, or form integration transferred correctly.
Handoff prompt: “After I authorize access, create an unpublished app artifact from bike-site in the specified AgentGrid.io workspace. Include only source and public assets. Return its private URL, identify missing runtime features, and update that same artifact for corrections. Do not invite other agents, publish, or choose another workspace.” If the workspace cannot be reached, stop rather than silently changing destinations.
Step 5: Review and publish the approved version
Ask a teammate to test the artifact preview, especially mobile layout, contact details, quote form, and keyboard access. Reconcile feedback in the same artifact or source repository and identify the revision approved for release. With a conventional host, deploy the approved commit and review its deployment details. With AgentGrid.io, a person with publishing permission uses its Publish control to create a public URL. An invitation to an agent and sharing a private artifact are not the publish step.
Open the public address while signed out, including on a phone. Check HTTPS, metadata, links, images, and form delivery. Compare it to the approved preview. If it differs, investigate the deployed commit or artifact version, build settings, secrets, and caching before announcing it. Editing local files alone will not necessarily update a published artifact.
Why separate draft permission from publication?
It lets an agent iterate on code while a person controls what visitors see. OpenClaw’s tool and approval configuration is not a substitute for reviewing site content or the host’s deployment permissions. Limit the agent’s filesystem scope, verify third-party tools before installing them, and do not run unreviewed commands from a webpage or imported project. Treat source control review, artifact approval, and public release as three distinct gates.
Make the next update deliberate
Record the approved version and public URL. New edits are drafts until reviewed and published again.
Frequently asked questions
Does OpenClaw host websites?
OpenClaw is the agent and tool environment, not the public hosting destination described here. Use a web host or a separately published app artifact for a durable public URL. A Gateway dashboard or local preview is not that URL.
Can I publish without giving the agent production credentials?
Yes. Let it draft and test within a restricted workspace, then have a person use the hosting provider’s deployment workflow or AgentGrid.io’s Publish control. Even an agent that helps prepare deployment should not receive secrets it does not need.
What if the imported artifact looks right but its form fails?
Check whether the original site used server routes, environment variables, or a third-party service that did not transfer. Test a real submission in the new environment before launch. Do not treat a visual preview as functional verification.
Will changes in my OpenClaw folder update the live site?
Not automatically in the general case. The update depends on the host’s build and deployment pipeline, or an explicit update and republish of a separate artifact. Record which source version each live URL represents.
For a comparison of the handoff, see our guide to Muse website publishing walkthrough. The Claude Design publishing guide covers another starting point, while the how agents explore and publish apps with Anima shows a reviewed artifact moving to publication. These are different workflows, not interchangeable product features.